Showing posts with label DIY. Show all posts

Wednesday, August 10, 2011

DIY Fabric Headband


I fell in love with fabric covered headbands at one of my favorite stores recently but at the cost of $28, there was no way it was going to make it back to my house. Of course I kept dreaming about them and decided that there had to be a simpler, more inexpensive way to make one, and this is what I ended up with...

Super cute, and super easy! It's a great project for beginner sewers or those who (like me) like a project that can be completed in a few hours (if that!) The entire project cost me nothing except time and the items needed are probably just sitting around your house.

I started out with a headband that was already falling apart...

(The fabric was unraveling at the end.) It came in a pack of 3 and since I don't really wear any of them any more, I will probably cover them even though the rest are still in good shape.

The fabric I used was a 3 inch wide scrap left over from a pair of silk pants that I had hemmed just a week prior so literally it was just laying around. I measured all the way around the headband (13 inches,) added 2 more inches and cut the fabric at 15 inches long...

After I ironed it flat, I folded it in half (to make it 1.5 inches wide,) with the right sides together and pinned it all the way down...

NOTE: Do not iron the fabric at this point! You'll have a weird crease when you finish!

Now it's sewing time! One straight line and you're done!

I used a 1/2 inch seam allowance all the way down. If you choose to hand sew, use only a single thread to do so. A bulky stitch will keep the overall look from feeling "fluffy."

Trim the edge to about 1/4 inch, and turn the fabric right side out so the seam is on the inside and you have a sort of fabric tube. now slide it onto the actual headband.

(The fabric should be longer than the headband.) Line the end of the fabric to the edge of the headband and gather it around the headband until it's tight about 1/2 inch at the end. (It doesn't have to look pretty, you'll be covering it.) I used a clothes pin to hold it in place.

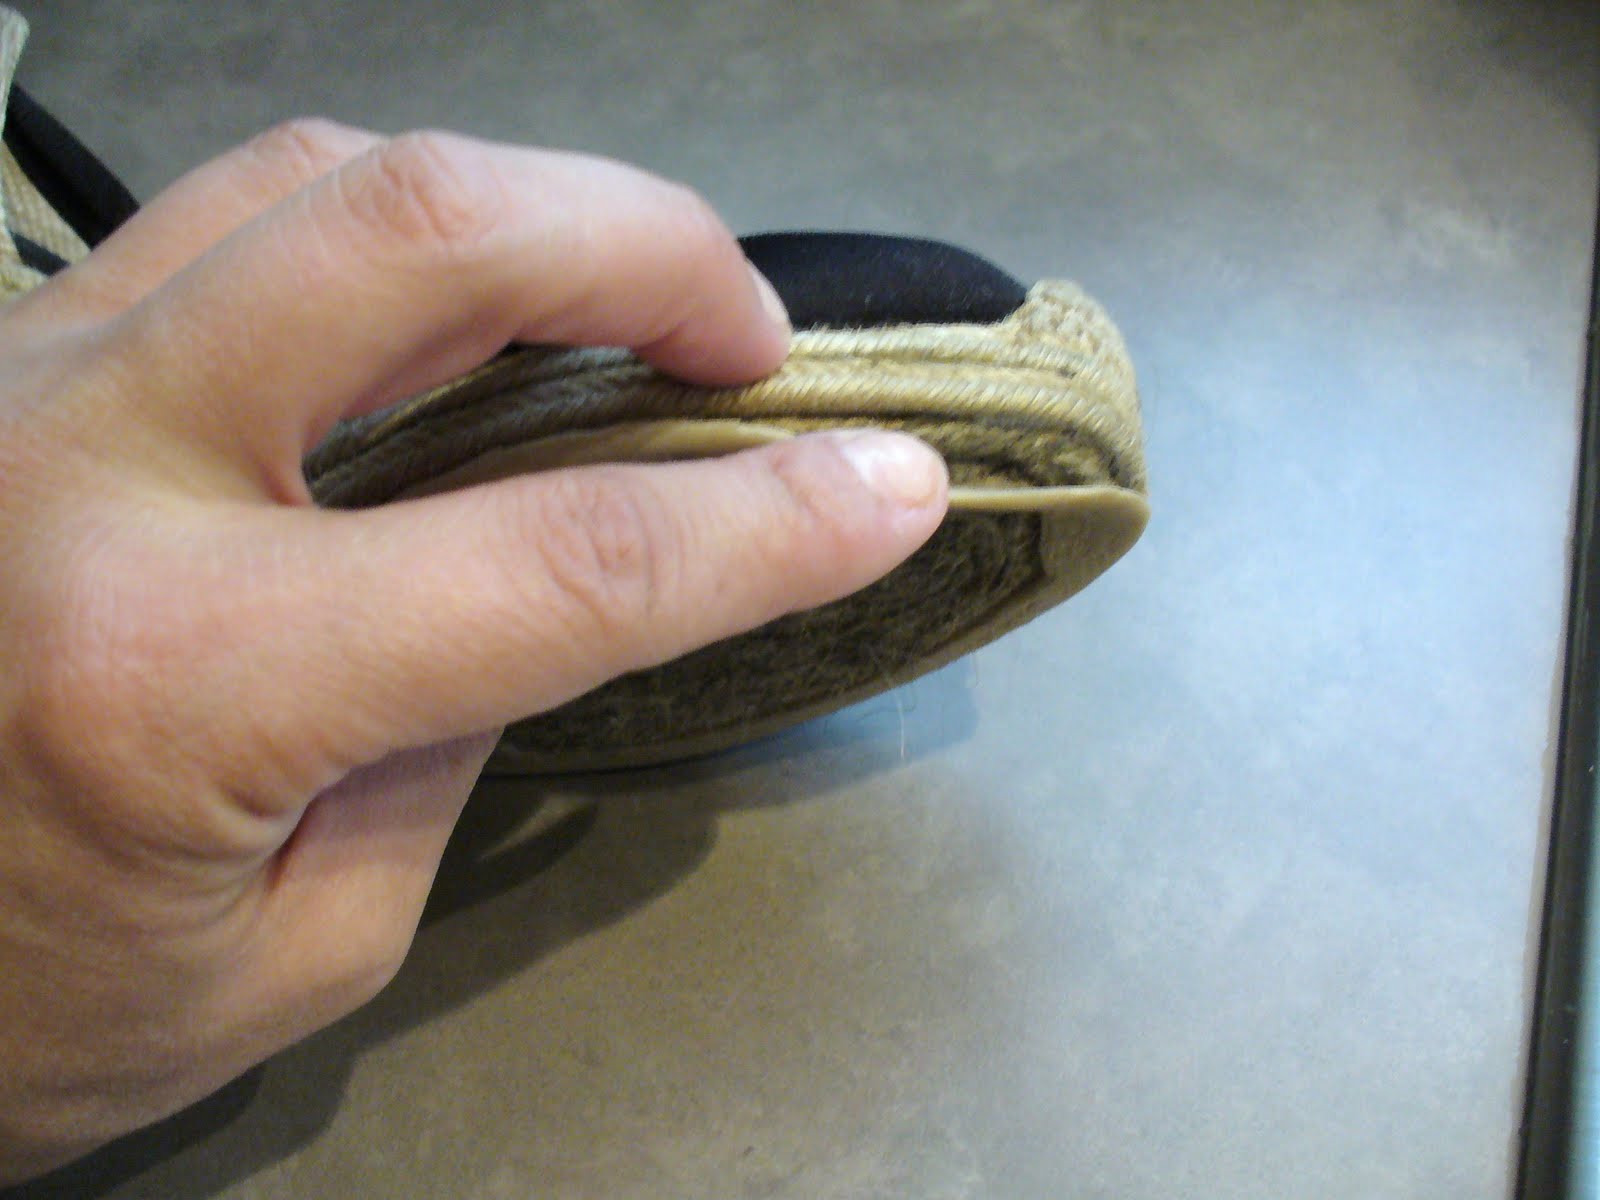
Again, I had a chunk of 1 inch grosgrain ribbon hanging around, but you can use felt or any other kind of fabric, you'll need an inch per end. After cutting the 1x1 square, apply a fabric glue (or whatever type of glue you prefer,) and fold the square in half over the end of the headband, covering and holding the fabric you gathered over the end...

(Bad photo quality...sorry!) Again I used a clothes pin to hold it until the glue dried some more, and repeated the process to the other end.

Important! Be sure your seam is straight when you finish the other end or the fabric will twist!

When the glue is almost dry but the ribbon is still bendable, trim the ribbon on the inside fold and the wrap the outsides around to the inside of the headband. (This took me a few tries...any better ideas?) Again, the clothes pins came in handy until the glue was completely dry. (I let it dry overnight.)

The finished product!

Sunday, July 17, 2011

Super Easy DIY Shoe Repair

I love these espadrilles/wedges! I've had them for about 6 years, they go with so many things and are very comfortable...

but they're finally falling apart!

Poor shoes! I know I could go out and replace them with another, similar pair but I just imposed a shopping ban for the next month and trust me, I've been shopping around for a while and haven't come across anything else I like as much. What's a girl to do? I could take them to the Shoe Hospital but it would take too long and I want to wear them now, plus they might not be worth the $30...it's true. How about repairing them myself? Ok. (Plus it's really easy!)

I just used regular white glue that dries clear (because that's what I had on hand,) in all the places the sole was coming off the shoe. I've used Shoe Goo in the past and it works really well, but I found it to be a bit messy, although, that's probably just me.

To hold it in place, I tried a clothes pin but this particular pair of shoes were to thick for it. But because it's a very soft sole, straight pins worked just fine.

Both shoes needed the repair. I wiped the excess glue off, let them dry a few hours and wore them...they held up great!

At least this will buy me sometime to continue the hunt for a new pair!
J.

Tuesday, April 19, 2011

DIY Holiday Home Decor-Blown Easter Eggs

I always loved dying hard boiled Easter eggs as a child but hated eating them! Not only am I not a fan of hard boiled eggs (unless deviled,) but I hated ruining my pretty creations! Then about 10 years ago, at Mom's suggestion, I tried blowing eggs and loved how they turned out! I haven't made them for a few years, so I decided that it was time to try it again.

The eggs with the sequins and words on them were from my very first try and with a little precaution, they've actually lasted. The 2 silver eggs I silver leafed a few years ago when some family had been visiting for spring break.

Blowing eggs is actually very easy, and if you plan to do this and decorate them with youngsters or group of people, I suggest doing the actual blowing ahead of time. (It's not the prettiest nor attractive part of the project, so doing this in front of someone you'd like to impress will likely turn them off...or maybe not...)

You'll Need:
Raw, uncooked eggs, as many as you wish to decorate
1 Pin
1 Bowl
1 Disinfectant wipe

First things first, you'll be putting your mouth directly on the egg, so as a precaution, wipe the egg down with the disinfectant wipe. If you plan on using the egg insides, wipe the pin with the wipe as well.

Next, begin poking into the end of the egg until you have created a hole about the size above, maybe even a tad bigger. This will be the bottom hole from which the insides come out and the smaller the hole, the harder it is to remove the insides.

Poke another hole at the top of the egg. This will be the end you put your mouth over. Sometimes the egg will begin to drip out the end, so make sure you do this over a bowl!

So here's the actual blowing part:
Take a deep breath, put your mouth down over the top hole, and blow! It may take a few tries and if this is seeming really hard, try making the hole at the bottom larger.

Yeah, this is a little gross.
Anyway, sometimes you need to blow a little harder to get the yolk to come out. You'll know when all of it is out.
At this point, I save the egg carton and put the blown eggs back into it, just to let them drain out a little. I give them a quick rinse and dry them before any decorating begins.

For the egg with words, I simply cut out phrases from different magazine articles and pasted them on with white glue that dries clear. Super easy. Oh and I covered the holes at either end with the paper.

The orange egg was dyed with (probably) Paas egg dye and then I just used a sequin confetti and glued each one on with white glue swirling around the egg, as I did for the plain white egg that's covered with gold sequins.

The silver leaf was something I had played around with in the past and just decided to try it. I used the traditional metal leaf size, a sort of "glue," let it dry for about 10 minutes then applied the silver leaf. This sounds a little intimidating but is really very easy.

For these two eggs, I actually had some stamps that I licked and put on the egg. I then simply went around the image and all around the egg with the twine and decorative rope, which helps hold down the edges of the stamps.

You could also just use an egg dye kit to color the eggs, run a string through the 2 holes and hang them making an egg tree. Or pick up a few egg cups like this...

(photo from crateandbarrel.com)
And use a paint pen to put names on them and use them as place holders for Easter dinner.

And since you're also left with this...
as long as you took care to not let any shell fall into the bowl, it's perfectly usable!
I made omelettes...
Mmmm!

J.

Wednesday, March 30, 2011

This Simple Alteration Ended My Frustration

So I got this great shrug/sweater for Christmas...

It's the perfect cover up for chilly nights (or AC) and it's even a little sexy with the deep V in front and in back. BUT...because of the sexy deep V it was always falling off my shoulders and which also made it a pain to wear! So it was regulated to a dresser drawer until I could figure out what could be done with it.

A month or so later, I picked up this little beauty at a really great price...

And it dawned on me that the crossed elastic was exactly what my shrug needed in order for it to stay on my shoulders! Not only that, but it is a relatively easy fix, just needing some basic sewing implements...

And of course, the trusty machine! The 1'' wide black elastic was no more than a couple of dollars.
So, first I measured across the elastic of the shirt, and added an extra 1/2 inch allowance...

and cut 2 pieces for the top X and 2 pieces for the bottom X...

Then I measured down from the shoulder seam of the shirt to where the elastic began and marked it out on my sweater with pins on both sides. This is where the top of the elastic would start. I did the same thing for where the elastic should cross over to the opposite side of the sweater, again pinning where the top of the elastic should start...

I'm not sure you can see it in the picture, but the edges of the sweater curl up a little, and this is how I was able to hide most of my stitching...

Ready to sew!
BUT........
It still wasn't quite right! It didn't fit as nice as the shirt did, the X wasn't as crisp and I couldn't quite figure out why until it dawned on me that the shirt front is a solid piece of fabric, the sweater is wide open! So after trying it on again, the solution was simple...smaller X! So while wearing it my mom, who happened to be visiting me last week, adjusted the elastic so it fit just right without losing the open back effect yet keeping it on!

Just a quick pic to show the results, the V is just as deep in the front, and it's not possible to wear it (legally) without something underneath. But I have this gorgeous red Andy The Anh dress that it would be perfect over...
J.